Many moons ago when I was still a baby sailor learning the ropes, I knew an older guy who sailed a West Sail 32 that he had finished from a bare hull. His brightwork always looked spectacular, with a shine deep enough it looked like you could reach into it up to your elbow. I asked him one day how often he stripped back to bare wood. “Never. The bottom layers of that varnish are 25 years old.” That was when I learned that a well maintained varnish job is essentially forever… if, and only if, it is well cared for.
The wood trim around our companionway had gotten rather worn. When we bought the boat it had been finished with Cetol, a product that is easy to apply, long lasting, and, its appearance is (as Karen would have me say) “not to my personal taste.” Because I think it is so ugly, it wasn’t something I was going to maintain, and it has finally really started to show its age and has started to fail. To preserve the wood, it needed stripping down and refinishing with a product that was going to be robust, and give us the look we wanted.
When finishing exterior wood of any kind, and especially on a boat, there are two big enemies: Sun and Water. Other than keeping things covered when you can, there isn’t much you can do about sun, but water damage can be prevented–if you are careful. In this case, “careful” means that there can be no route that allows water to get to the wood under or around the finish. To do that properly requires disassembly as much as possible to be sure that all sides of the wood are finished and sealed.
Disassembly
There is a limit to how far we can disassemble the wood without major demolition. Some of it is going to have to be finished in place.
It starts off easy, the trim on the from of the horizontally sliding hatch is held on with four exposed screws. To remove that hatch itself, the two metal brackets need to come off the front of the rails.
The port side is easy, the two nuts are accessible in the utility cabinet over the sink. The starboard side is more complex and requires disassembly of interior trim.
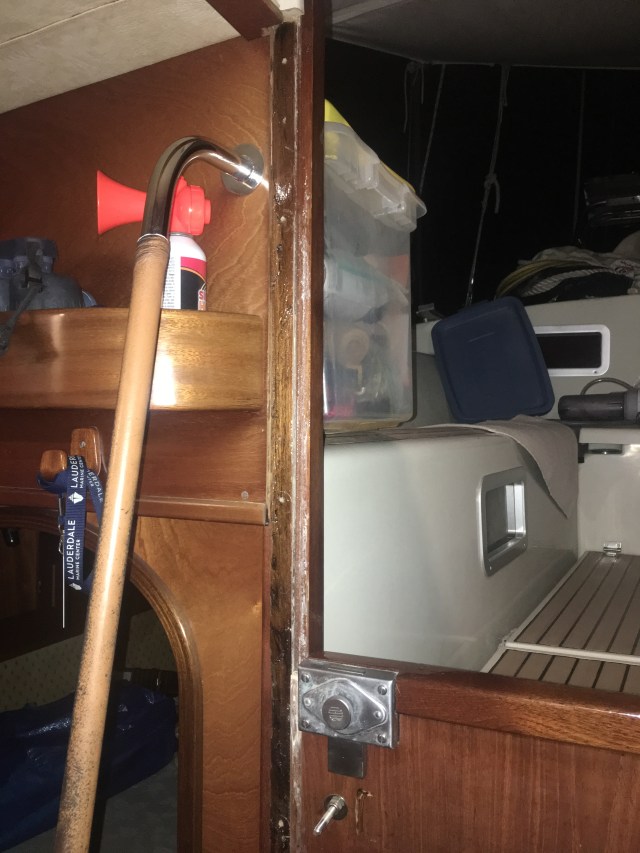
 Looking aft from the nav station, remove “Panel A” (Three screws), then the hand rail (already off in the photo). Loosen the overhead “Trim C” that frames the overhead opening of the companionway, it doesn’t need to be completely removed. Remove three more screws, and then “Panel B” can be worked loose and removed. The horizontal bolt is immediately visible, the vertical one is hidden behind the headliner. Peel it back JUST enough to get a socket on the nut. The headliner will be held in place without further work when you reassemble everything.
Once the metal brackets are off, the hatch can be removed simply by sliding it out of the rails. There is a rubber weatherstrip along the forward edge that helps keep any water that gets under the seahood out of the cabin and reduces air infiltration when the hatch is closed. In our case, the sliding fiberglass parts of the hatch have worn enough over the years that it is starting to rub in places it should not. That was easily fixed by adding some self-adhesive plastic slide tape to the worn places. That both restored the clearance so things fit right, and provides a low friction sliding surface that is easily renewed when needed.
Once you remove the hatch, the wood shelf above it that serves to deflect water is easily removed with one wood screw, and one bolt. To reach the nut on the bolt, you need to have already removed the hatch. There is silicon caulking that also holds this in place. CAREFULLY cut and pry it off. If you are rough, you risk splitting the wood.
Now the tough bit… the vertical companionway slide. You can not lift the slide out of its track because it hits the overhead dodger before it rises clear of the rails.
There are three options when refinishing this that I know of. First is to lift it as as high as possible, and work on as much as is exposed, and ignore the rest. Since I really wanted to completely seal the edges of the wood, this was not the option for me. To remove it, most people remove the dodger. Certainly possible. But there is another way that seemed like it would work better for me.
I cut the track apart on the starboard side. Using a fine kerf saw in my Fein multitool, it was slow, but easy work. Now the rail is in two pieces, and can be reattached with screws so the slide is easily removable when ever needed. This is the way it should have been built in the first place. We added a gasket under the cut off piece that serves two purposes. It takes up the space that the saw kerf removed so the fit stays the same, and it keeps the system at least as water tight was it was originally designed.
Fortunately, the Amel design esthetic is that if screws are needed, they are almost always left visible, in a kind of “industrial chic” look. I considered countersinking and plugging them, but decided to leave them “naked”.
The slide in place, with the rail cut away for removal. This picture is taken after all the trim has been reinstalled.
The last parts removed (all with easily visible wood screws) are the trim piece that holds the weatherstripping at the bottom of the vertical slide, and the piece on the bottom of the slide that acts as a stop.
Sanding and Veneer Repair
All parts are carefully sanded starting with 80 grit, than 150, finally 220. When sanding with 80 be careful to stop sanding as soon as the old finish is gone, but be sure to get all of it otherwise your new job will look blotchy and uneven. Always, always, always use a sanding block or mechanical sander to keep the surface flat and smooth. My Fein tool with its various detail sanding attachments was a godsend for some of the hard to reach bits, and a standard 1/4 sheet orbital sander for the large flat surfaces but, mostly, just a hand sanding block. Life is short, change sandpaper often!
We had hoped that the front surface of the vertical slide would have enough veneer thickness remaining to refinish, but that was not to be. I aggressively sanded through the old veneer once it was clear it wasn’t going to work. We got some new teak veneer and carefully cut, fit, and glued a beautiful new surface.
Getting to this point with everything sanded, and masking tape applied around those pieces that could not be removed took two full days.
All bare wood was first coated with West System Epoxy with Clear 207 Hardener. This quickly builds thickness, and help to seal out water. I then used 5 coats of a two part polyurethane varnish (Bristol Finish) to complete the look.
