I sat down to write this, and thought it would be short, simple and easy. I think it turned into an example of what in the military would be called “mission creep.” Even with all these words, I feel like I have left out a lot that I think useful, but I hope it is helpful for somebody. In general, most advice people have posted on how to deal with these seals is useful and accurate, so I won’t repeat it, but there are some bits that I believe are important that been left out, and others have been mis-represented and should be corrected.
This has been written specifically with owners of Amel’s Super Maramu sailboats in mind, but the general information is, well, general and useful to anybody. It is not intended as an instruction manual, rather a review of basic and important concepts.
I might add more to it if there seem to be specific issues that come up, or if there are corrections that need to be made.
Seals, Seals, and more Seals…

Almost anywhere there is a rotating shaft on a piece of machinery, somewhere along the way there is a lip seal. Its job is to keep the oil, or grease, on the inside, and dirt, water, and other environmental contaminants on the outside. Deceptively simple looking little things, when installed correctly they are long lasting and trouble free. If things are not done right, they can be an endless source of frustration and even long term damage to expensive mechanical parts.
It seems when ever Amel owners talk about the care and maintenance of their boats, the various seals very quickly come up as being the source of problems. There is a lot of advice floating around, some of it good, some just harmless misconceptions, and some dangerously wrong ideas. I am not trying to cover everything about these seals here, just some general points that will help you maintain your boat and keep the various liquids where they belong.
There are a lot of lip seals on a modern boat. On Amels, there are about a dozen that seem to get the most attention. There are three seals on each of the four sail furling gearboxes, one on the bow thruster prop shaft, one axial sliding seal on the bow thruster vertical shaft, and the set of three on the main prop shaft. There are a lot of others, in the engine, transmission, and various pumps, but that set of a dozen or so are the ones that seem to give the most grief.
Some General Background
Lip seals have been around a very long time. They seem a very simple thing, a rubber ring that rubs on a shaft that separates lubricant from the surrounding environment. But almost a hundred years after they were invented, there are still PhD theses being written about how—exactly—they work. It is defiantly one of those topics where the deeper you dig, the more nuanced and subtle things are. The basics, however, are well understood.
Although there are literally hundreds of variations, the kinds of lip seals, the ones we are talking about here are very standard types. They are not special or “magic” in any way.
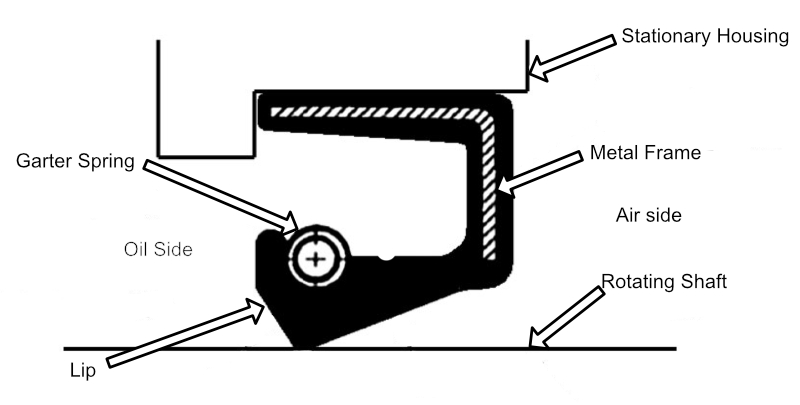
They consist of a metal frame that provides structural rigidity to the whole part. The metal frame is covered with molded rubber on all sides, and the actual “lip” is formed from this rubber. For the kinds of seals we are talking about, the rubber used is Buna-N [Note 1], which has the proper combination of flexibility, hardness, and oil resistance to work well. The last part is the “garter spring.” This spring helps hold the lip tight against the shaft. It is especially important if the shaft has even at tiny bit of wobble, or “runout”. With one important exception, the grater spring is always on the “inside” of the seal.
Each lip seal has two sealing surfaces. The outer rim is a static seal and has no moving parts. Some seals will have a coating of anaerobically cured glue on the outer rim to help hold the seal in its housing. Then there is the lip which rubs on the rotating shaft. [Note 2] Each of those mating surfaces MUST be clean and smooth for the seal to do its job. Dings, dents, and scratches to either the shaft or the housing WILL cause failures. So the take-away lesson here is to do everything possible to protect the shaft and the housing from any damage.
Out with the old….
Let’s start with how to remove a seal, and some basic concepts.
Seals can not be reused once they have been installed. There is no way to reliably remove them without damage either to the internal metal frame, or the rubber sealing surfaces. Even if they were simply installed incorrectly and never run pulling them out can not be done with the expectation of putting them back in correctly. Because of this, we do not worry about getting the seal out in one piece, rather the focus when pulling a seal is to be absolutely sure you protect the seal housing and the shaft from scratches or other damage. Repairing even minor damage to these surfaces can be very difficult and expensive. Seals are cheap and easy to get. New shafts and housings–not so much.
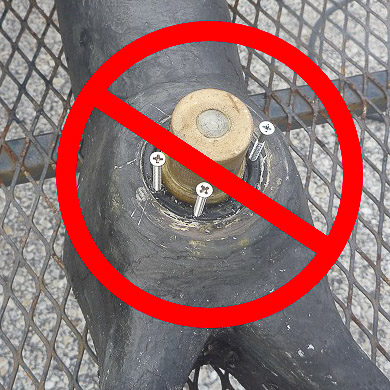
To safely remove a seal, you must first remove the shaft it runs on to give you access to the inner diameter of the seal. If you think you need to remove a seal with the shaft and housing both still in place, you are surely missing something. You will occasionally see people working around a shaft by drilling and driving screws into seals and removing them with a slide hammer or other pulling tool. DO NOT DO THIS! The risk of damage to either the shaft or the static housing surface are way too high. This is one of those things that has been repeated on the internet often enough that “it must be right.” It is not. If anyone came to my boat and tried to do this, I’d send them packing. There might, somewhere, be a piece of equipment where this technique is needed, but I can assure you there are none on an Amel that are part of routine owner maintenance.
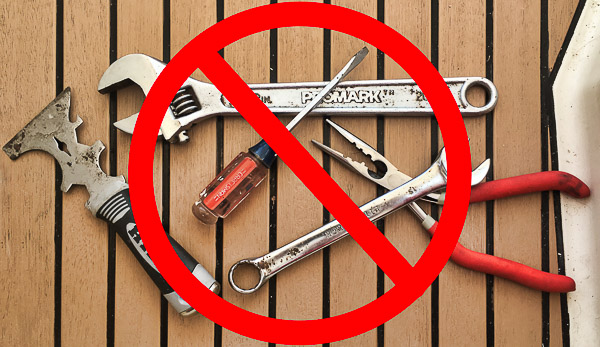
Another suggestion regularly seen is to use a screwdriver, or two, or a wrench, or pliers, or some other misappropriated tool. Another bad idea. While some of these will work–after a fashion–they all require a significant level of care and skill to avoid scratching the seal housing or shaft. It’s not worth the risk of a small slip of the hand that can cost thousands of dollars to repair. This is a case where the right tool for the job is the RIGHT tool.
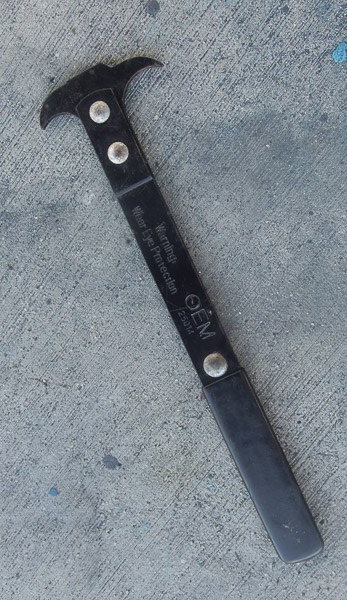
Get yourself a proper seal puller. A very simple tool, but one that can save a lot of frustration. The curved tips are designed so they will not gouge the vital outer sealing surface of the seal housing. Unlike a screwdriver it will give you the leverage needed to get even stubborn seals out very easily. You have a boat worth hundreds of thousands of dollars, a US$10 tool is a good investment. There are fancier, more expensive ways of doing this, but this tool will address 99% of seals, and every one I have had to work with on my Amel.
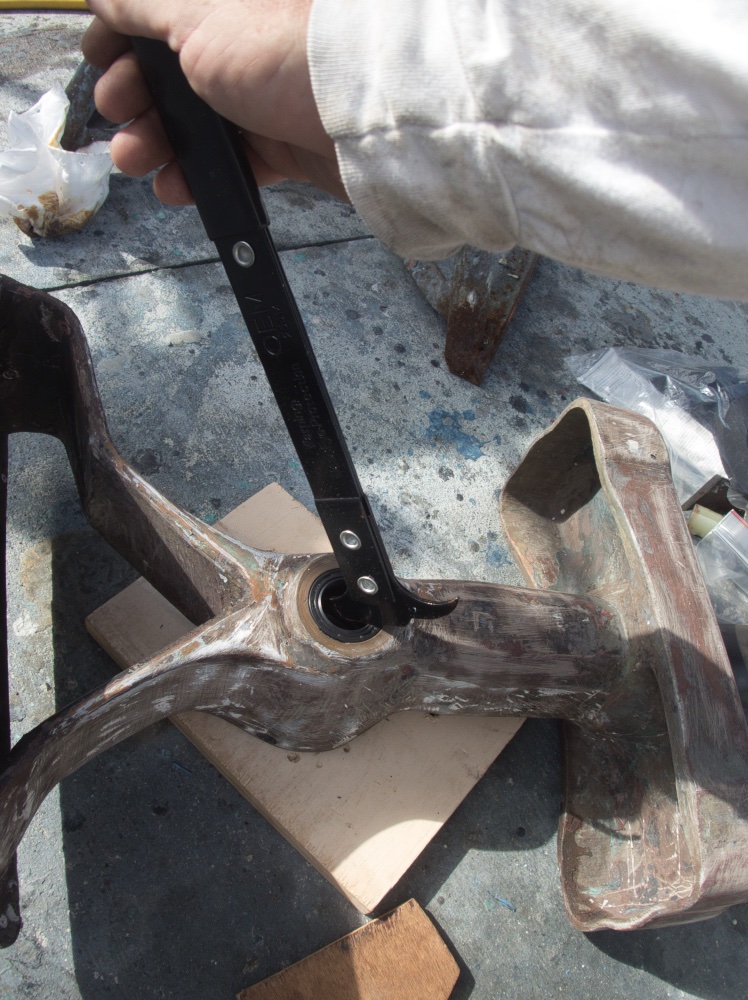
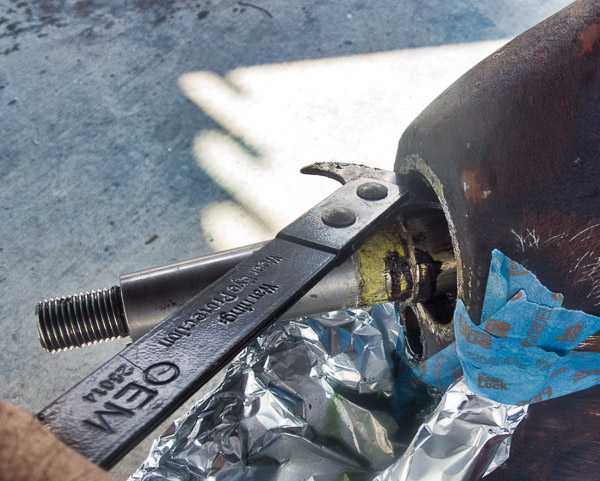
With the “wearing-out bearing” removed, a seal puller makes for quick and easy removal of even the third, and deepest, seal on the Amel C-Drive prop shaft with minimal risk for damage to the surrounding housing.
The prop shaft on the Amel C-Drive is a bit different. We can not remove the shaft itself, but Amel gave us the “wearing out bearing” that can be removed and gives us access to the inner diameter of the seals for easy installation and removal. This is another place where “creative” techniques are frequently employed in the absence of the right tool for the job. You really, really, REALLY, do not want to damage the seal housing here!
And In With the New.
When installing a new seal, there are a couple of checks to make. First, is it a good fit? Standard seals are sized by three numbers: The shaft diameter, the diameter of the seal housing, and finally the axial thickness. So a number like: 25x40x5 means a seal for a 25mm diameter shaft, a 40mm diameter housing, and the seal is 5mm thick. Usually these numbers are on the flat, outside face of the seal, but some manufacturers put them on the face of the lip itself.
Seals need to fit rather tightly both in the housing and on the shaft. Shafts need to be smooth and polished, and not just in the place where the lip of the seal will run, but everywhere from that point, out to the end. Any rough spots will scratch or tear the rubber lip while you are sliding the seal into place. The end of the shaft must have a small chamfer. A sharp corner on the end of the shaft makes putting the seal in place without damage very difficult. Seals should never be slid into place over threads, keyways, or other such machining on the shaft.
On my boat, there is only one fitment that is a problem. That is on the manual furling gearbox for the mainsail. The seal housing for the manual input shaft was machined to 40.5mm. Too big for a 40mm OD seal, and too small for the next size larger, which is 42mm. This is the only seal that I feel the need to use a liquid gasket material on. Without it, the seal rotates in its housing and does not work. I have no idea if this was a machining mistake, or if Amel had access to some weird size seal that no one else has ever heard of, but a few drops of RTV fix the issue.
In general, if the sealing surfaces are in good condition, you will be be best served by avoiding adding any extra sealant. The surface of the seal will do a good job sealing things all by itself. If the housing is less than perfect, you want to be sure you use a fully rubber wrapped seal. These have a layer of the rubber sealing material on the outer diameter of the seal where it contacts the housing. This supplies a bit of “squish” to fill any minor damage. Small scratches to the seal housing surface can sometimes be helped with a SMALL smear of RTV, but be very careful it doesn’t get into places it does not belong. Be sure the RTV has cured before going any further in the installation.

When installing these seals, it is important to lubricate first so it slides in smoothly, without tearing or scratching the rubber coating. Lubrication needs to be on both the lip and the outer surface. I use a silicone grease from Dow Corning, Molykote 111. There are many different formulations for silicone grease. If you know of one better than this, feel free to use it instead. I know from experience that Molykote 111 is extremely waterproof, and does not affect rubbers and other elastomers, and it is compatible with petroleum oils and greases. It is also one where I know I am buying from the manufacturer, not dealing with a consumer packaged product where the specifications can change as they buy from whoever is cheapest that week.

Make sure you are putting the seal in the right way up! Push the seal in as straight as possible with your fingers first, and then VERY carefully tap it into place. Short of having a hydraulic press and a custom made tool made to fit that seal, use a smooth, flat piece of wood that spans the whole surface of the seal that you gently tap with a dead-blow hammer. Go very slowly, and stop often to check and be sure it goes in straight. Do not use a metal hammer, and never hammer directly on the seal itself.

For installing the prop shaft seals on the C-drive I have a piece of aluminum pipe that has an inside diameter a bit bigger than the prop shaft, and an outer diameter a bit smaller than the seal housing. With this it is almost impossible to put them in crooked, and it is long enough that I can tap the end with a plastic hammer making the installation a piece of cake. This can also be done using the old wearing out bearing, but it then takes extra care to keep everything straight. The installation of the last (outermost) seal is especially critical. You need to be sure that you are pushing ONLY on the very outer circumference of the seal, on the metal frame, NOT on the unsupported rubber lip. See more discussion about the prop shaft seal below…
Comments on Individual Seals
A couple of important things I have noticed about the specific seals on an Amel Super Maramu that might be helpful.
Bow Thruster Sliding Seal
The seal on the vertical shaft of the bow thruser is a bit different, since it is a sliding seal, not a rotating one. When we were doing the first bow thruster maintenance on our boat, I noticed that the vertical shaft was literally “furry” with glass fibers. These would have quickly damaged the rubber seal.
I very gently sanded the shaft with 600 grit paper to remove the exposed glass fibers, and then coated it liberally with silicon grease. Every couple of months I renew the grease. It helps keep the seal watertight, and it slides with less friction. Again, I pack the inside lip of the seal with Molycote 111 to help lubricate, and protect the garter spring.
On some later boats, I understand that Amel installed a screw and washer to keep the seal from pulling out when the thruster was raised. Our seal fits the housing tight enough, and the lubricated shaft slides easily enough, that we have never needed such a stopgap.
C-Drive Underwater Shaft Seals
A seal that gets a lot of discussion with Amel owners is one of the most critical on the boat, the three lip seals that separate the oil in the C-Drive from the ocean. There is a lot of comment on this that is less that completely accurate. First, the three lip seals are not there as “redundant” seals. If you think about it, they all wear at the same rate, so why would an extra worn-out seal help? Rather, they all have different jobs.
To understand these seals, we have to know that seals are tiny little pumps. It is not obvious, and the detailed physics of why they do this are not well understood, but it is well known that lip seals move a tiny, but consistent, amount of liquid from the “air” side to the “oil” side. Just to be clear, they pump liquid toward the side where the garter spring is visible.
Let’s trace the three seals… The seal that is on the outside, closest to the ocean, is installed with the garter spring toward the ocean. This one, at least, needs to have a stainless steel garter spring. It will be moving liquid from the “inside” out toward the ocean. Its job is to keep as much water as possible on the outside–where it belongs. If any water seeps in, it will move it back out.
Now we come to a critical part of this seal set that does not receive the attention it deserves. Grease. If you do not pack the space between these seals with a good waterproof grease, they will not work–or last–as designed. Amel recommends a silicone grease, and because they are uniformly very waterproof, that is what you should use. Here again, I use Molycote 111, but others will likely be as good. You want a grease that will not be washed out by water, OR by the lubricating oil inside the C-Drive itself. Petroleum based greases should not be used here. They are less waterproof, and will be flushed away by the oil in the drive chamber.
The grease serves a couple purposes here. It acts as a physical barrier by preventing both water–and oil–from moving through the seal set, it lubricates the seals as they rub against the shaft, and it keeps any abrasive particles that might find their way inside in suspension and prevents them from rubbing between seal and shaft.
The seals fit close to each other, so a large amount of excess grease is not needed, but be sure the lip is completely full, and there is enough left over to lubricate the lip and outer surface while it is being installed.
Exterior Seals.
Some of the seals on the gearboxes for the main and jib furlers have an especially difficult job. They are oriented toward the sky, so they are exposed to UV radiation, and they collect salt water, which evaporates and leave abrasive salt crystals behind.
When replacing these, it is worth considering using “double-lip” seals if they are available in those sizes. A double lip seal looks like a regular lip seal, except the rubber has been molded into an extra lip on the outside that is specially shaped to help keep contaminants away from the main seal.
Regular rinsing with fresh water to remove collected salt, and any clever arrangements you can come up with to reduce sun exposure will help extend the life of these.
These are very important to grease well on installation. There is no other way to lubricate them.
Note 1: As an interesting point of trivia, Buna rubber was the first commercial scale artificial rubber. It was developed in Germany in the early 1930’s when it was expected that they would lose access to natural sources of latex rubber during the war that they know was coming. [Return]
Note 2: There are a very few seals which work “backwards,” i.e., the seal is fixed to the shaft and rubs against the housing. [Return]
Links to products on these pages are sometime affiliate links. From these I might get a small commission on any sale. These are products I use and find useful. We are not paid to put these links up, nor do we get free products from any suppliers. You price is not affected by the commission. I try to link to places with the best price I know of at the time of publication, no matter if I get a commission or not.

Thank you very useful and informative
LikeLike